You write a prompt, hand it to your coding agent, and wait. A few minutes later, you get back… something. Maybe it compiles. But it ignores half your requirements, invents an abstraction you never asked for, or quietly breaks a pattern the rest of the codebase depends on. So you re-prompt. And re-prompt again. And burn through the context window before you’ve shipped anything.
If that loop feels familiar, the problem usually isn’t the model. Left to guess, a Claude Code session fills the gaps you didn’t realize you’d left open: ambiguous requirements, unclear scope, missing acceptance criteria, and no way for it to verify its own work.
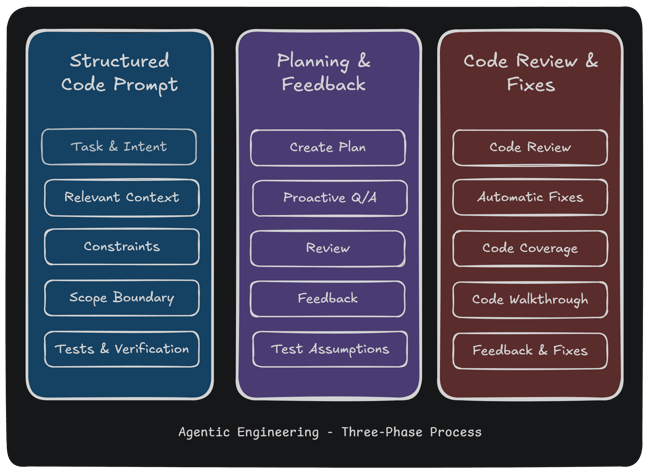
The fix isn’t a cleverer one-off prompt. It’s a repeatable process around the prompt. In this blog, I am going to show you the three-phase Claude Code workflow that I follow whenever I’m working on a coding task:

Thanks to this three-phase process, I am seeing more coding sessions end up in implementing what I need while also avoiding frequent long session runtimes, wasted sessions and context window overflows. Adopting this process shifts you from Vibe Coding to Agentic Engineering, and it’s the difference between hoping for good output and engineering it.
Vibe Coding vs. Agentic Engineering
 Vibe Coding is the now-common practice of prompting an agent, skimming the result, accepting it if it looks about right, and moving on. The problem shows up the moment the code has to live in a real codebase: the agent fills any ambiguity with guesses, and you inherit whatever it guessed.
 Agentic Engineering is the opposite stance. You treat the coding agent as a capable but literal collaborator and keep the engineering disciplines that earned their place over decades, such as clear requirements, a plan, tests, verification, and review. The agent does more of the typing; you stay responsible for the engineering.
Here’s the contrast at a glance:
| Vibe Coding | Agentic Engineering | |
| Requirements | Implied in a one-line prompt | Stated explicitly, with scope and intent |
| Planning | None (straight to code) | A plan you review before any coding starts |
| Verification | “Looks right” | Tests and acceptance criteria that the agent must meet |
| Review | Skimmed or skipped | Code review and a walkthrough before merge |
| Best for | Prototypes, throwaway scripts | Code that ships and has to be maintained |
The three-phase process below is what Agentic Engineering looks like in day-to-day practice.
Start with a Structured Code Prompt to Capture Intent
A good code prompt gives the coding agent a single task with a well-defined scope and verification criteria. Here’s a prompt template you should copy and fill in before every coding task:
[One imperative sentence describing the task.] [One or two sentences
on why... the intent behind it.]

Before making any changes, read [relevant files, modules, or patterns
to reference].

The solution must [constraint], [constraint], and [constraint]. Do not
touch [out-of-scope items].

Write [testing expectations -- e.g., "unit tests for any new logic"]
and ensure the existing suite passes. The task is complete when
[verifiable criterion] and [verifiable criterion].
Instead of a one-line task statement, this prompt template encourages you to think about and communicate clearly:
- A single, imperative task statement. One sentence, active voice, no ambiguity. "Add pagination to the
/usersendpoint," not "It would be good to handle large user lists maybe." - The intent behind the task. A brief "why" helps the agent make sensible judgment calls when it hits edge cases you didn't anticipate. "…so the endpoint doesn't time out on large datasets."
- Pointers to relevant context. Name the specific files, modules, or existing patterns the agent should read before touching anything. Don't make it go hunting.
- Constraints. Technical, stylistic, or operational limits the solution must respect — e.g., "don't change the public API surface", "follow the error-handling pattern in
auth.ts", "no new dependencies". - Explicit out-of-scope items. Anything adjacent that a reasonable agent might assume is fair game. Being explicit here prevents well-intentioned over-reach.
- Testability expectations. Should the agent write new tests, update existing ones, or just verify the suite still passes? Left unspecified, this is a common source of inconsistent output.
- Verifiable acceptance criteria. Each criterion should be checkable without human judgment — a passing test, a specific curl response, a lint run with no errors. "It should work correctly" is not a criterion.
Here is an example prompt written using this template:
Add offset-based pagination to the `GET /users` endpoint. The
endpoint currently returns all users in one query, causing production
timeouts as the table has grown past 500k rows.

Before making any changes, read `src/routes/users.ts`, the existing
pagination pattern in `src/routes/posts.ts`, and the `paginate()`
helper in `src/db/helpers.ts`.

The solution must default to page=1, limit=20 so existing callers are
unaffected, use the error-handling pattern in `src/lib/errors.ts`, and
introduce no new dependencies. Do not touch any other endpoints, the
User model, or the database schema.

Add unit tests for the new logic in `src/routes/users.test.ts` and
ensure the existing suite passes. The task is complete when:
- `GET /users` returns a meta object with page, limit, and total
- `GET /users?page=2&limit=10` returns the correct slice
- Error handling is implemented for invalid page parameters
You can find the complete prompt template here.
Why does this work?
The Structured Code Prompt directly addresses common mistakes such as ambiguous requirements, unclear scope, missing verification steps, and acceptance criteria.
More importantly, it forces you to think about these before starting every coding task, gain clarity on them, and, in turn, transfer this clarity to the coding agent.
Lastly, by referencing relevant files and existing patterns, you provide the coding agent with a significant boost in code understanding, helping it discover important files, code flows and similar patterns to follow in the code it writes.
Code Prompting Anti-Patterns to Avoid
A structured coding prompt gives you the best starting point for your coding session. However, there are still a few anti-patterns you should avoid:
| One-Shotting an Application | Large or Multi-part Tasks | Repeating Project Context | |
| Example | “Build a dashboard for my application.” | “Create a blog editor, media manager, and spell checker.” | “The purpose of this project is to...” |
| Why | The agent must make many assumptions. | Scope and requirements become unclear. | Shared context is hard to maintain. |
| Preferred Approach | Split into smaller tasks. | Break work into smaller tasks or use follow-up prompts. | Store context in CLAUDE.md or AGENTS.md. |
| Exception | Demos, reports, throw-away projects. | Tightly coupled tasks. | When evolving project scope or architecture. |
Even when you follow the Structured Code Prompt and avoid anti-patterns, we recommend planning the changes rather than jumping straight into implementation.
Use Claude Code’s Plan Mode to Align on Implementation
When starting a new task, use Plan Mode to create an implementation plan before the agent starts coding. Plan Mode allows the agent to:
- Explore the codebase and gather context
- Check any ambiguities or assumptions in the plan
- Understand what to do
- Break down the requirements into a step-by-step plan
- Align with the user on the details
Most coding agents provide a Plan Mode, which in Claude Code you can trigger by pressing Shift + Tab twice (or with the /plan command). First, enable Plan Mode and then start your coding session with a Structured Code Prompt:
/plan Add offset-based pagination to the `GET /users`
endpoint... [rest of your structured prompt goes here]
Your coding agent will return a plan file like this:
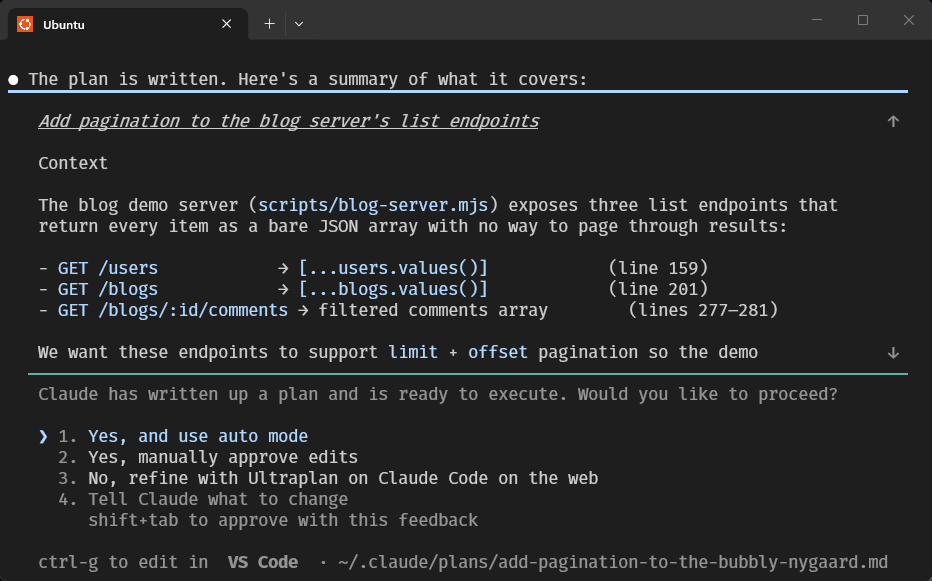
Once you have the plan in hand, you can edit it directly or ask the coding agent to make changes to it, allowing you to align the agent with your understanding of requirements and code changes.
Why does this work?
The Plan phase provides dedicated time and space (in terms of tokens) for the coding agent to plan before it begins implementation. Here, the focus is on understanding and connecting rather than just making something work by any means.
When you start without a planning phase, you are telling the agent to do just the bare minimum thinking (and planning) needed to complete the task and stop as soon as you hit the task goal (or close to it).
It is, therefore, no surprise that coding sessions without a planning phase often miss requirements, which later require further iteration, design consolidation, and simply more effort if we had started with a plan.
Pro Tips for Using Plan Mode
Once you have the plan in hand, it is time to align the agent with your understanding of requirements and code changes.
Participate in the Planning Process:
Ask the agent to run any requirements ambiguity, implementation decisions or blocking issues with you during planning:
/plan Add offset-based pagination to the `GET /users`
endpoint... [rest of your structured prompt goes here].

In case you need to confirm any major design or implementation
details, blocking concerns or requirement ambiguity, use the
question tool to ask me clarifying questions before writing
the final plan.
The agent will now ask you questions as it works towards a plan.
Review Plan and Provide Feedback:
The best part of the plan mode is that it returns a PLAN.md file you can edit before implementation begins.
Here are some things you should focus on in your feedback:
- Interface design, file placement or naming.
- Adding/removing something from the scope.
- Asking for more thorough test coverage.
- Correcting the agent on its assumptions.
- Changing the code design to fit with the architecture.
Once you have provided feedback, the agent will give you an updated plan file.
Check Your Assumptions:
Sometimes, the plan does not cover all implementation details. Ask the agent clarifying questions about the plan and test their understanding from the planning phase.
Here are a few questions I like to ask:
List all the interface changes you're going to implement.Which files are going to be impacted by this implementation?Is there any requirement that significantly increases implementation complexity?Can you explain how you will test the XYZ feature?
Once you’re satisfied with the plan, you can ask the agent to finally start implementation.
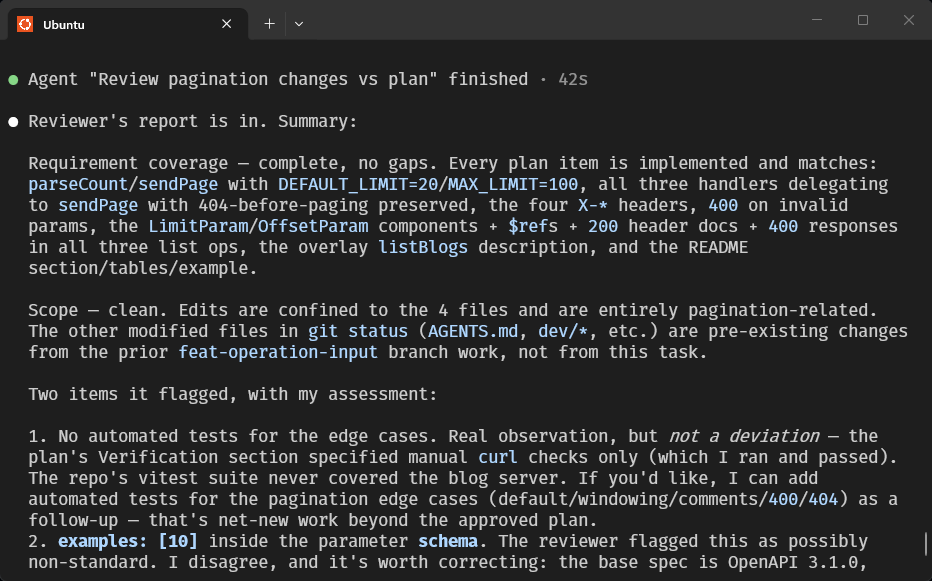
Close with an AI Code Review and Walkthrough
Once the implementation is complete, we have our conversation history and the generated code in the coding agent's context window, presenting yet another opportunity to improve the coding task output.
Code Review
Doing an automated code review using your coding agent is one of the lowest-hanging fruit you can go for post-implementation. Never skip this!
You can use the /code-review command, which comes built into Claude Code or Codex. However, I prefer this prompt, adopted from Claude’s docs:
Use a subagent to review the changes against `PLAN.md`. Check
that every requirement is implemented, the listed edge cases
have tests, and nothing outside the task's scope changed. Report
gaps, not style preferences.
This gets you both a code review and a validation against the acceptance criteria.
Once the agent responds with a list of issues, you can ask it clarifying questions or simply ask it to fix the issues.
Fix the issues you found.Why does this work?
It might seem strange to have the coding agent review its own code. Think of it as asking the agent to start with a fresh mind (or rather, a fresh context window), but with a focus on reviewing code rather than writing code.
Usually, these steps help me fix 2 to 4 issues after each coding session with minimal effort.
Code Coverage Check
This is another low-effort improvement that you can ask your coding agent to do for you:
Check the test coverage for the new code and updated code
files. Then close any gaps by adding new tests.
Why does this work?
The coding agent reads your CLAUDE.md or AGENTS.md file and knows which test runner you are using, as well as the commands to run it.
Since I mainly code in TypeScript, I use Vitest as my test runner, which supports generating a test coverage report with the command vitest --coverage.
The coding agent automatically runs this command and, based on the observed gaps, writes new tests to close them.
Code Walkthrough
Usually, at this stage, I am ready to start reviewing the code myself.
If you’re doing Agentic Engineering rather than Vibe Coding, you should review all generated code before committing it to your repository. However, it may feel like there is always more AI-generated code than you can keep up with.
Let's tackle this AI-generated problem with more AI!
Write a walkthrough tutorial to help me onboard onto the new code
changes.

- Make sure to introduce me to the new concepts, interfaces and
flows introduced as part of the code changes and connect them to
existing ones in the codebase.
- Identify any gotcha or surprises that came up during the
implementation.
- Use code snippets and examples in your explanations.
- Always link to the specific files or code segments you are
talking about so I can navigate to them if I need to.

Note that I am already familiar with this codebase, but the code
changes are completely new for me.
This creates a customized step-by-step onboarding tutorial to help familiarize you with the code changes.
Sometimes, I will add a statement in the prompt, asking it to focus on a specific concept or issue: Add a focused section on how authentication works for the APIs.
Why does this work?
With the planning details and code changes in the context window, the coding agent is well-equipped to provide a concierge walkthrough of the changes.
The walkthrough helps you avoid expending precious developer hours on random walks through Git by having the coding agent act as your guide, just as in-person code review sessions do.
As you go through the code walkthrough, feel free to flag any issues you find during your review back to the coding agent and ask it to fix them. Usually, I try to gather the issues in a scratchpad somewhere and then paste them into the coding agent to fix all in one go, especially when the list is small.
What Did We Learn?
The three-phase implementation process is simple:
It works because it steers engineers away from a vibe coding workflow towards proper “Agentic Engineering”, where requirements, design, testing, verification, and code review are fixed parts of your coding routine.
The best engineering teams integrate coding agents into their existing Software Development Lifecyle (SDLC) rather than working around it.
In the future, we will touch upon more topics critical to Agentic Engineering, which I could not cover here due to space:
- Documenting Context (
CLAUDE.mdorAGENTS.md) - Project Structure and Navigability
- Scaling Engineering with AI
Meanwhile, here’s a quick tip to improve your coding session: check out APIMatic’s Context Plugin, which helps speed up writing API Integration code whenever you’re working with your favorite APIs.
Frequently Asked Questions
How do I get better results from Claude Code?
Give it less to guess. Most disappointing output traces back to an underspecified prompt, so start every task with a structured prompt that states the task, the intent, the files to read, the constraints, what’s out of scope, and verifiable acceptance criteria. Then plan before coding and review after.
What is Plan Mode, and when should I use it?
Plan Mode is a read-only mode where the agent explores your codebase and proposes an implementation plan without changing any files. In Claude Code, you enter it by pressing Shift + Tab twice (or with the /plan command). Use it for anything non-trivial, such as multi-file changes, refactors, or unfamiliar code. If you could describe the diff in one sentence, you can skip it.
Is Agentic Engineering different from Vibe Coding?
Yes. Vibe coding means accepting AI output on a quick “looks right” judgment; Agentic Engineering keeps requirements, planning, testing, verification, and review in the loop so the agent’s work holds up in a real codebase. Same model but different process around the prompt.
Do I still need to review AI-generated code?
Always. The walkthrough and code review steps in this workflow make the review faster, but they don’t replace your judgment. Before anything merges, you should understand what changed and why. Having the agent generate a focused walkthrough is the cheapest way to get there.